Drawing tools
The rail on the left holds the tools. Tap a tool once to pick it; tap it again to open its options.

From top to bottom:
- Brush (B)
- Eraser (E)
- Fill (G): the paint bucket.
- Eyedropper (I)
- Select (L): freehand, rectangle or magic wand.
- Move (V)
- Shapes (U)
- Pen (P)
- Node (A)
- Smudge (S)
- Colour: tap for the project palette, the basic colours and the colour picker.
- Size: drag the slider, or tap the number for exact values.
[and]on a keyboard. - Undo / Redo: also two-finger and three-finger taps on the canvas.
In portrait
Turn the iPad upright and the tools lie across the top, under the document's name, with the size slider running sideways. The canvas gets the whole width.
Brush
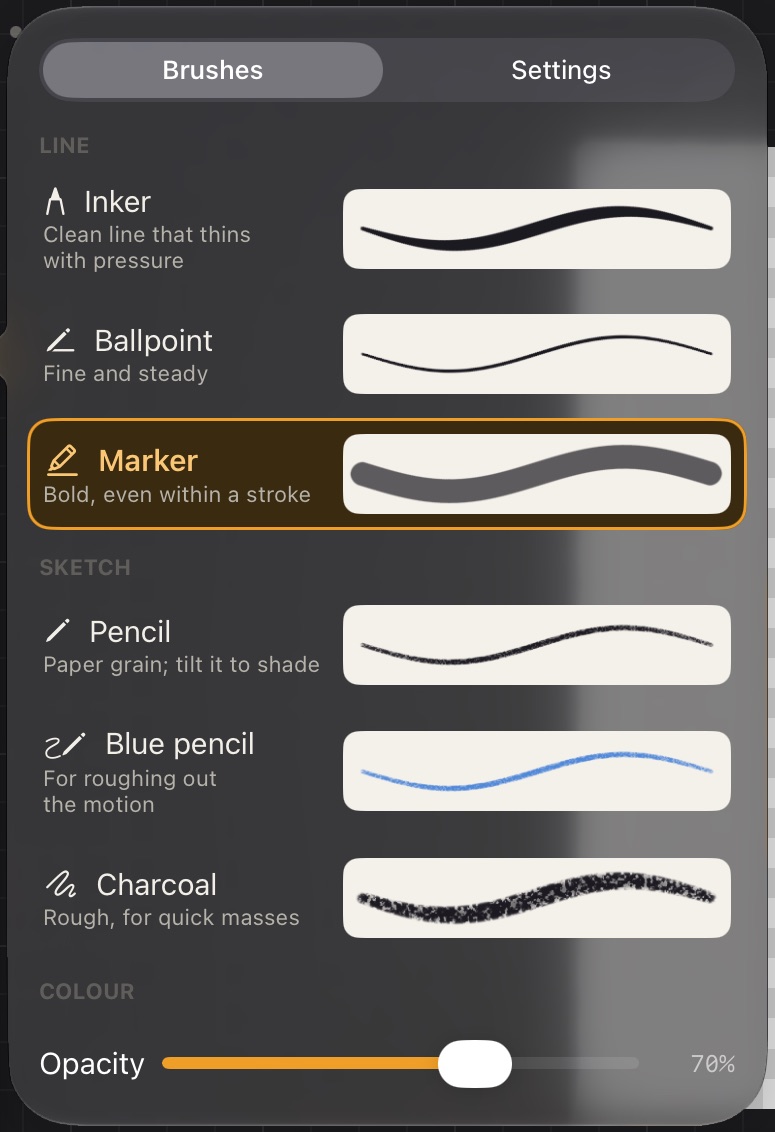
Tap the brush again to open the brush library: every brush with a sample of how it paints.
| Brush | What it's for |
|---|---|
| Inker | Clean line art: thins with light pressure. |
| Ballpoint | Fine, steady lines and small details. |
| Marker | Bold and even, at 70 %: it doesn't get darker where the stroke crosses itself. |
| Pencil | Sketching on paper grain; light pressure is lighter, and tilting the Pencil shades with the side of the lead. |
| Blue pencil | The same pencil, always light blue, for roughing out motion under the clean line. |
| Charcoal | Rough and grainy, for quick masses. |
| Paintbrush | Soft edge and a tip that tapers in. |
| Airbrush | Very soft; builds up as you go over it, for gradients and glows. |
| Flat | A hard, even fill with no pressure: colouring. |
Each brush remembers its own size and opacity: the size slider on the rail shows the current brush's, and Opacity sits under the library. The rail's brush icon changes to the brush you chose.
The Settings tab has the options for every brush:
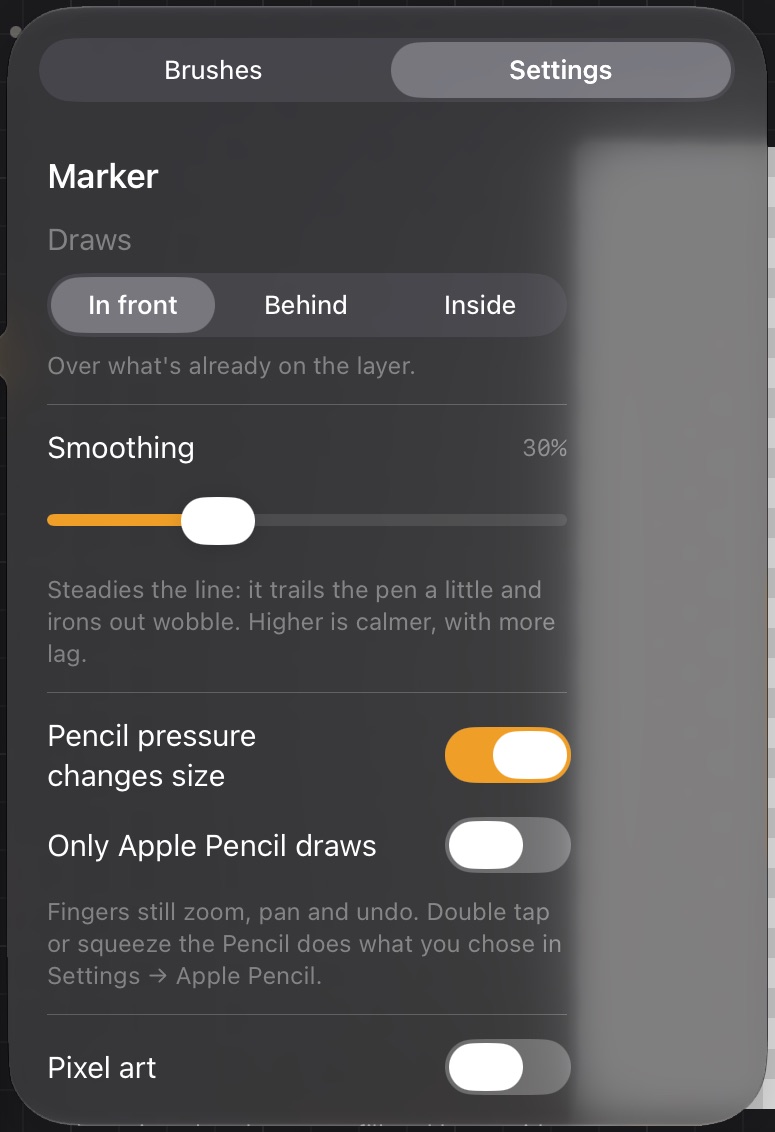
- Draws: where the paint goes on the layer.
- In front: over what's already there.
- Behind: under what's there. Colour under line art without touching the lines.
- Inside: only on what's already drawn, keeping its edges. Shading and recolouring.
- Smoothing: steadies the line. Higher is calmer, with a little more lag.
- Pencil pressure changes size: turn it off for an even line.
- Only Apple Pencil draws: fingers never draw; they still zoom, pan and undo. See Apple Pencil and gestures.
- Pixel art: hard edges for this project. The brush size becomes a width in pixels: size 1 paints exactly one pixel, 2 a 2×2 square, 3 a 3×3. Pressure and tilt don't change it.
Eraser
The eraser has its own size, remembered separately from the brushes. Tap it again to choose its tip: any brush's edge, like a soft airbrush or a grainy pencil. In pixel art mode it erases whole pixels.
Fill
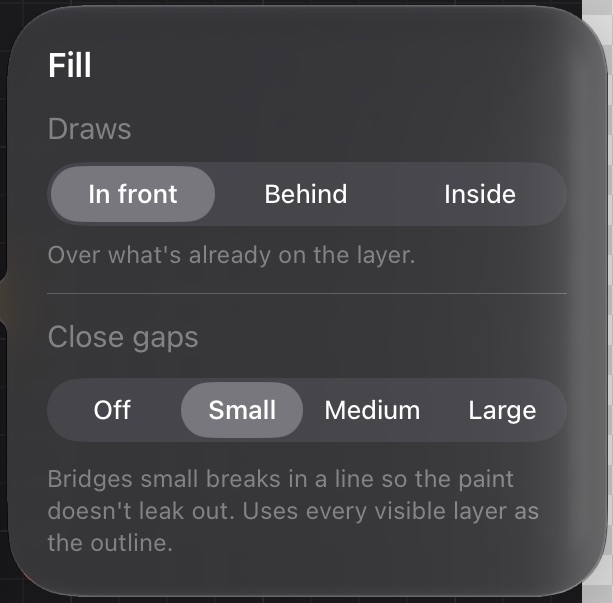
Tap inside an outline to fill it with the current colour. The outline is everything visible, on every layer, but the paint goes only on the current layer. Draw lines on Line, select Color, and fill there: the colour stays under the lines.
- Draws: in front, behind or inside, as with the brush.
- Close gaps: bridges small breaks in the line so the paint doesn't leak out. Try Small first.
Eyedropper
Tap anywhere on the canvas to take that colour. Calco then switches back to the tool you had.
Select
Mark part of the drawing, then decide what to do with it. While Select is on, a bar under the canvas has its shape, how a new mark combines, the wand's tolerance, and Paste once something is copied; tapping the tool again opens the rest:
- Shape: Freehand (draw around it), Rectangle (drag a box) or Wand (tap a colour: it takes the patch of that colour, as it looks with every layer, and the neighbours as alike as the tolerance allows; in Block, everything drawn that touches it, whatever its colour: a head with its outline, eyes and fill in one tap).
- When you mark: Replace the selection, Add to it, or Subtract from it. A tap in Replace lets the selection go.
- Select all (⌘A), Invert selection (⇧⌘I) and Paste.
In pixel art, a lasso, a rectangle or Select all keeps only the pixels drawn inside it, so the selection hugs the sprite pixel for pixel; while you draw it, the pixels it will take show outlined. What's selected shows with marching ants, and stays while you change tools, frames or layers. Meanwhile the brush, eraser, fill, shapes and smudge only reach inside it: shade a cheek without going over the line, or colour one part of a sprite.
With Select, the bar over it has Transform, Fill (the current colour), Clear, Copy, Cut, Invert, Paste (once something is copied) and Deselect (✕, ⌘D, Esc). With nothing selected and something copied, a Paste button waits under the canvas.
Transform lifts what's selected to move, scale, stretch or rotate it, on every visible layer at once, so the lines and their colour move together (locked layers and guides stay put; with nothing drawn inside, a note says so):
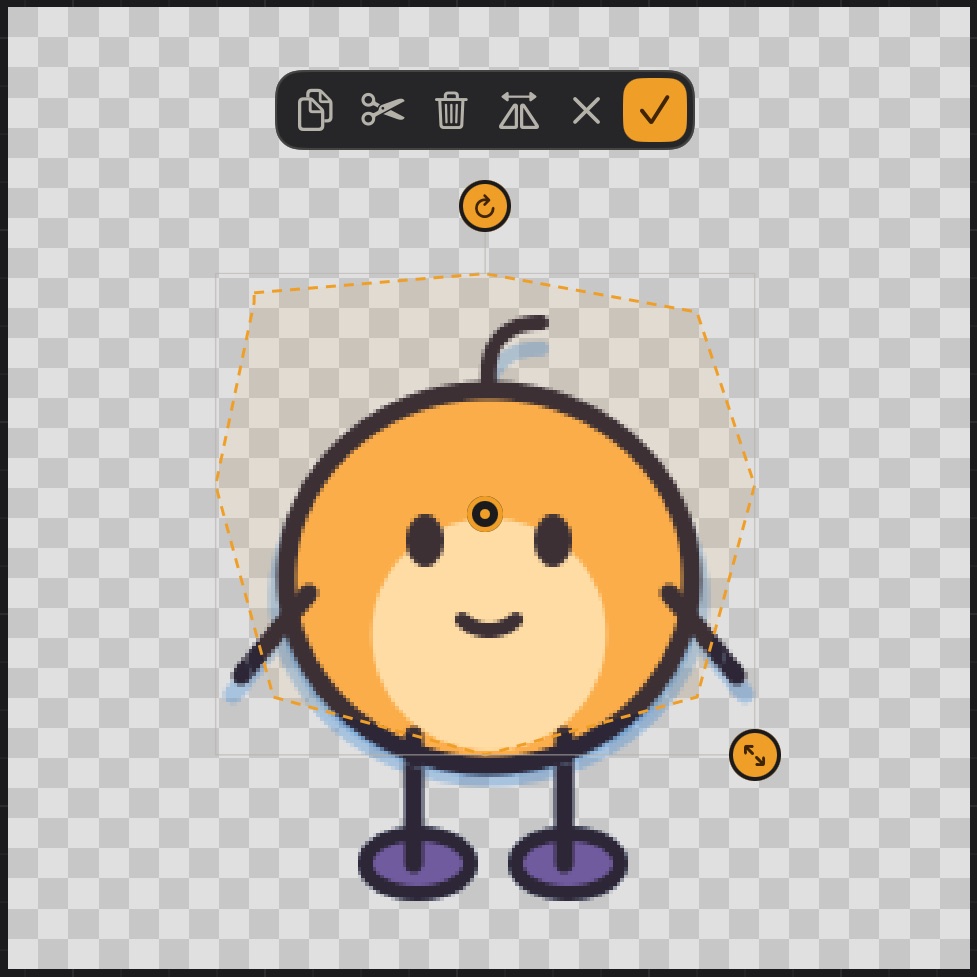
- Drag inside to move it.
- Corner handle: scale. Side handles: stretch it wider or taller from the opposite side, which stays put, for squash and stretch. Round handle: rotate. Centre dot: the point it scales, stretches and rotates around; drag it to move it (to the feet, say, so a squash keeps them on the ground).
- While you scale or stretch, a chip shows the width and height as a percentage. Each one clicks back to 100 %, or to the other's proportions, with a light haptic tap.
- Uniform | Free, under the canvas, is what the corner does: keep the proportions, or stretch width and height apart.
- The bar above it: Copy, Cut, Paste (once something is copied), Delete, Flip horizontally, Cancel (✕, Esc) and Apply (✓, Return). Tapping outside also applies. Applied, the selection goes where the drawing went.
Paste lands where you copied, on whichever frame and layer you're on: handy to carry a pose to another drawing and adjust it.
Move
Move picks up the drawing on the current layer, at the playhead, to move, scale or rotate it, with the same handles as Transform.
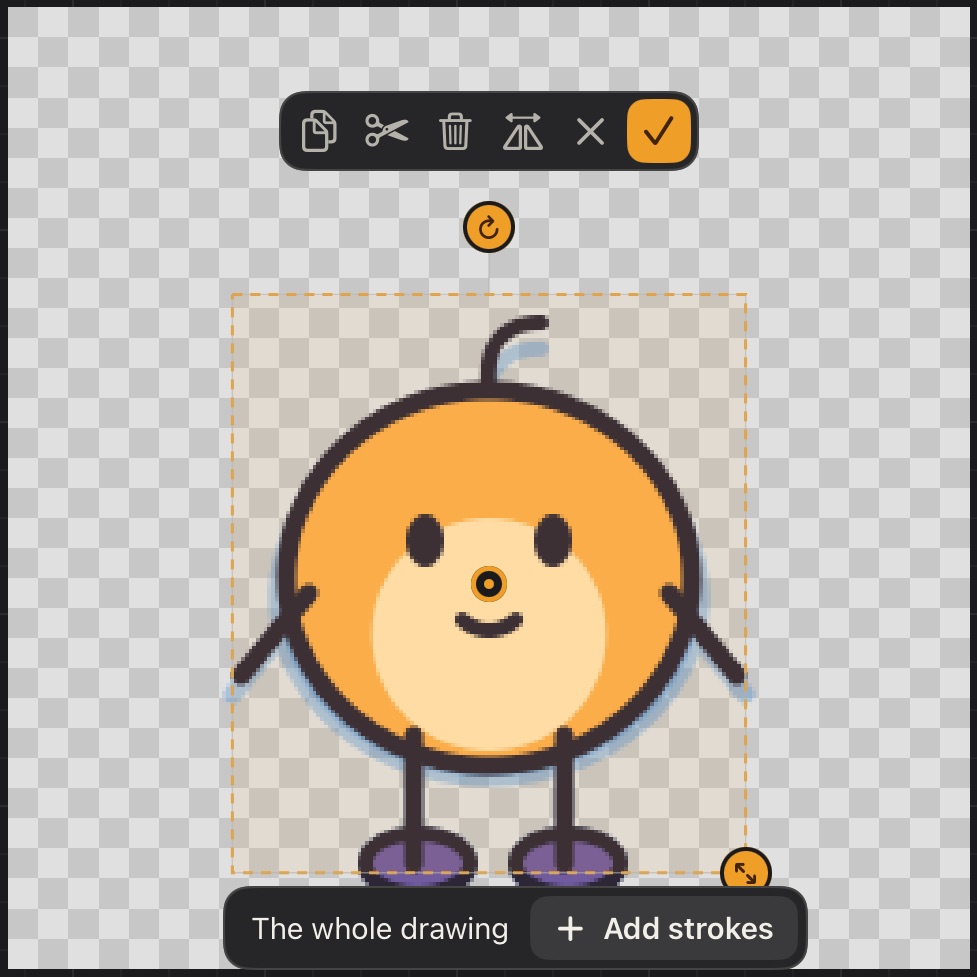
- Choosing Move picks up the whole drawing, in a box that hugs the paint.
- Tap a stroke to pick just that one: an eye, a hand, an antenna. Calco remembers every stroke you draw with the brush, so it picks the exact stroke even where it crosses others.
- Drag a stroke to pick it up and move it in one go.
- Tap outside the box, on a blank spot, to put down what you're moving (like ✓). Tap the Move button again to pick up the whole drawing.
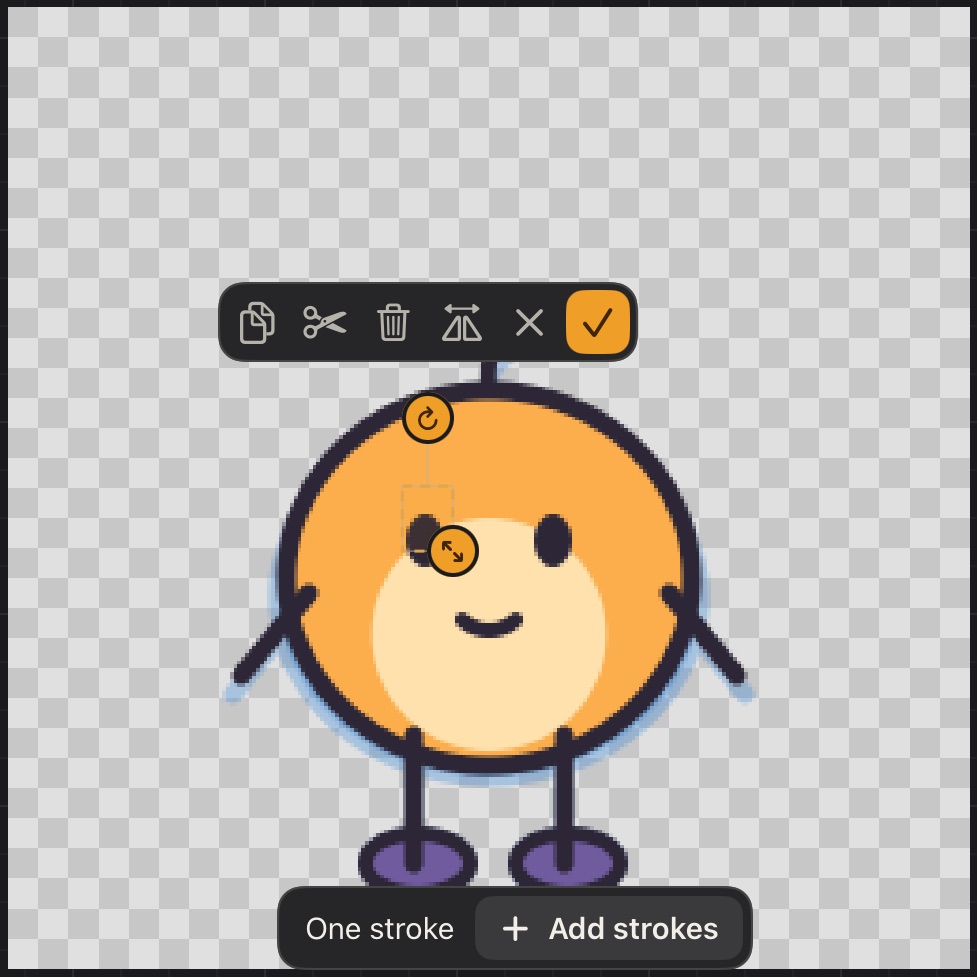
Scaled, stretched or turned, a stroke stays sharp: Calco paints it again where it lands, with its brush, instead of resampling its pixels. Strokes that were erased, filled or transformed with Select, and imported images, are resampled.
Where several strokes cross, tap the same spot again to go to the one underneath; the hint under the canvas says which one you have. Add strokes makes each tap add a stroke to what you're moving, or take it out, to move a few together.
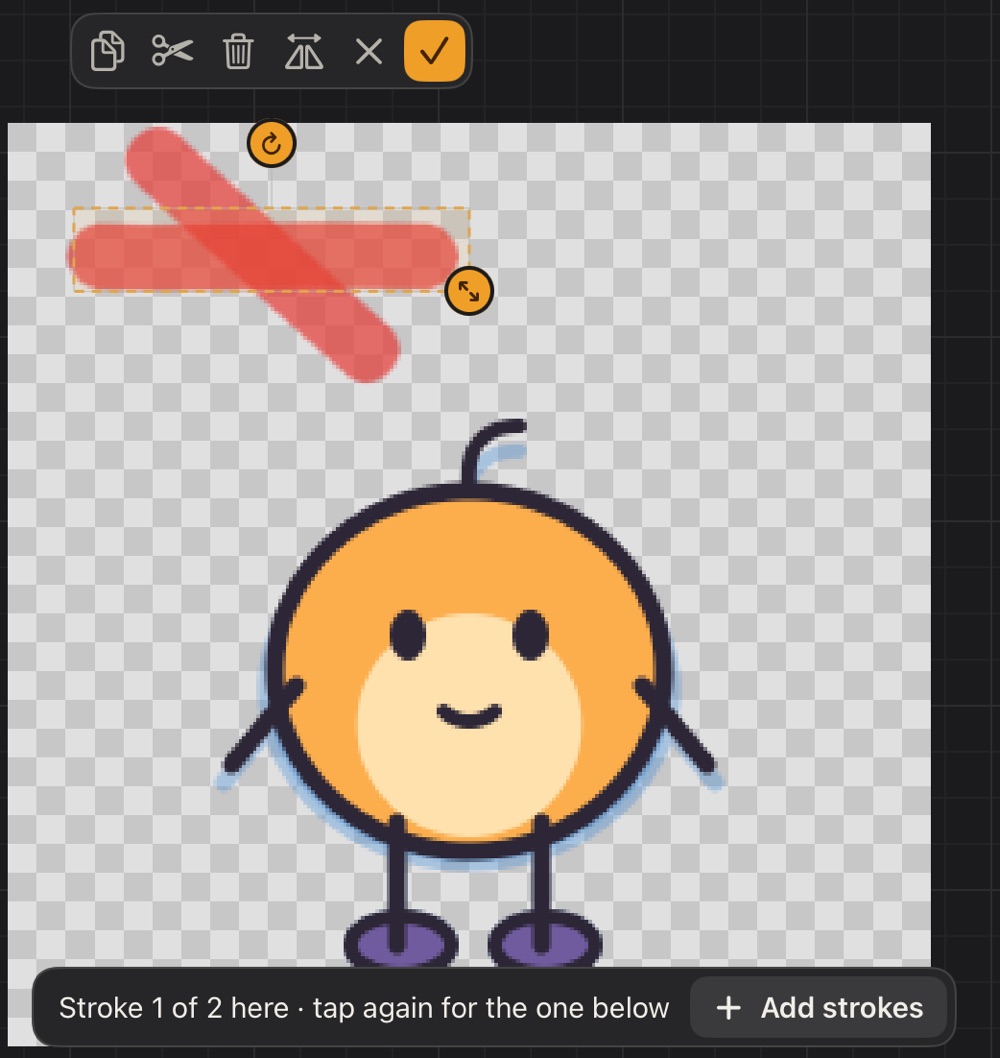
Moving, rotating and scaling click back into the starting place, upright (or a quarter turn) and the original size, with a light tap you can feel; the pivot clicks back to the middle. So you can always return to where you began. Tap outside, change tool or change frame to drop it; the whole move is one undo step.
- Moved strokes stay strokes: you can pick them again later.
- The eraser trims the strokes it crosses. A fill, Select or a paste merge the drawing, which then splits into its separate shapes.
- On a locked layer, such as an imported image, Move offers Unlock and move, and locks it again when you're done.
In front or behind: with strokes, shapes or paths picked, the bar over them has Bring to front, Bring forward, Send backward and Send to back: their place among the drawing's other pieces, on the same layer. It shows at once, and lands (one undo step) with ✓.
Shapes
Shapes draws lines, arrows, rectangles, ellipses, triangles, polygons, stars and rounded rectangles. Its icon in the bar shows the shape chosen; tap it again for its options:
- Shape, and the polygon's sides or the star's points.
- Outline: solid, dashed or dotted.
- Thickness: also with the size slider while Shapes is chosen.
- Fill: no fill, filled, or fill only. With a fill, pick Line's colour or Its own to give the inside a colour of its own, apart from the outline (the bar's colour).
- Brush: the inker, for a clean line, or the brush you have chosen (a pencil square, with grain).
Drag from corner to corner on the canvas; the shape comes out in the bar's colour when you lift. Near 1:1 it clicks into a perfect square or circle, and lines and arrows every 45°, with a light haptic tap; the chip under it gives the size.
Each shape is one undo, and a piece of its drawing: with Move, one tap picks it all up, and it stays sharp when scaled, stretched or turned.
Pen
The Pen draws by joining points:
- Tap to place a point; a straight line joins it to the one before.
- Drag as you place a point, or pull it afterwards, to curve it: two handles come out that shape the curve on each side. Pull a handle to change it; on a curved point both turn together.
- Tap the line to add a point there and curve from that spot.
- Tap the first point to close the path.
While the path is open, the bar under the canvas turns the picked point into a Corner or a Curve, closes or opens the path, deletes the point, opens its Style, cancels (✕) or finishes it (✓, Done). Changing tool, frame or layer finishes it too.
Style (or tapping the Pen again) changes the open path's outline (solid, dashed or dotted), thickness, fill (on closed paths) and brush; they're the same settings as Shapes. The colour is the bar's: opening a path puts its colour in the bar, and a new colour goes to it.
A path can be edited again: with the Pen, tap it and its points come back. It's a piece of the drawing, so Move picks it up whole and it stays sharp when scaled or turned.
Node
Node edits paths and shapes point by point, and never draws:
- Tap a Pen path or a shape to see its nodes. Shapes (rectangles, ellipses, polygons…) edit like paths: an ellipse is four curved nodes. Arrows can't be edited this way.
- Drag a node or its handles to change the shape. Node never adds nodes: that's the Pen's job.
- Drag on an empty spot to draw a box: it picks every node inside, and dragging one moves them all together.
- Tap a node twice to switch it between corner and curve.
- Tap away from the path to finish (like ✓); a tap on its line lets go of the picked nodes.
The bar under the canvas is the Pen's: how many nodes you have, Corner or Curve for all of them, delete them, cancel or finish. You can switch between the Pen and Node without closing the path.
Smudge
Smudge works the paint already on the layer:
- Smear drags it along with your finger.
- Blur softens it where you go over it.
- Motion blurs it along the way you move, like a trail.
Tap Smudge again for the mode, the strength and the tip (soft, or the chosen brush's). The size is the bar's, and pressing harder with the Pencil works the paint more. Whatever Smudge goes over is no longer a stroke Move remembers: it stays as pixels.
Grid
The grid button at the top right makes moves go in steps: what you move with Move, Transform or Paste sits down on the grid, its top-left corner on a line, every 1, 2, 4, 8, 16 or 32 pixels. A 16 px block lands right on a 16 px tile. Show the grid draws its lines faintly over the canvas. Moves still click back to where they started. It's saved with the project.
Symmetry
The symmetry button at the top right paints with a mirror: Left–right, Top–bottom or Four ways. The brush, eraser and smudge paint again in the mirror as you go; fill, shapes and the Pen don't.
- The axes show dashed over the canvas. Drag the dot at the end of one to move it; it clicks back to the middle, and a double tap centres both.
- Axes sit on a pixel edge or a pixel's centre, so in pixel art the mirror is exact, pixel for pixel.
- It stays on, with its axes, in the project: a symmetric sprite stays symmetric.
Project palette
The colour panel starts with the project's own colours, named: the character's line, body, face… Tap one to paint with it.
- + keeps the current colour in the palette. A project without a palette has From the drawings, which picks the colours its drawings are mostly made of.
- Long-press a colour to Rename it, Duplicate as variant, Remove it, or Change everywhere…: pick the new colour and every pixel of the old one turns into it, in every drawing of every clip, soft edges included, even where it meets another colour. Remembered strokes change too, so they stay sharp with Move. One undo takes it all back.
Good for a palette swap: duplicate a project or a clip, change the enemy's red to blue, and you have a second enemy. Guides are left alone. In pixel art projects only the exact colour changes.
Pixel art
With Pixel art on, every tool works on whole pixels: no soft edges on the brush, eraser, fill or selections, and moved selections stay crisp. Turn it on when creating the project or in the brush options.
View
- Flip view (the mirror icon in the top bar, or H) shows the drawing mirrored without changing it, to spot mistakes with fresh eyes.
- Fit returns to the fitted, upright canvas (⌘0); a flipped view stays flipped.
- Zen mode hides everything but the canvas and a small floating bar with undo, redo, every tool and the colour. Swipe three fingers down to go in and up to come out, like the timeline's grip (or ⌃⌘F).