Selection and transform
Selecting
The selection slot in the rail holds four tools, as in Aseprite:
| Tool | Key | How it selects |
|---|---|---|
| Rectangular marquee | M | Drag a rectangle. |
| Elliptical marquee | ⇧M | Drag an ellipse. |
| Lasso | Q | Draw around the area. |
| Magic wand | W | Tap a color: with a tolerance, contiguous or not, from the current layer or all layers. |
The options bar picks the mode: replace, add, subtract or intersect (instead of Shift and Alt on a computer).
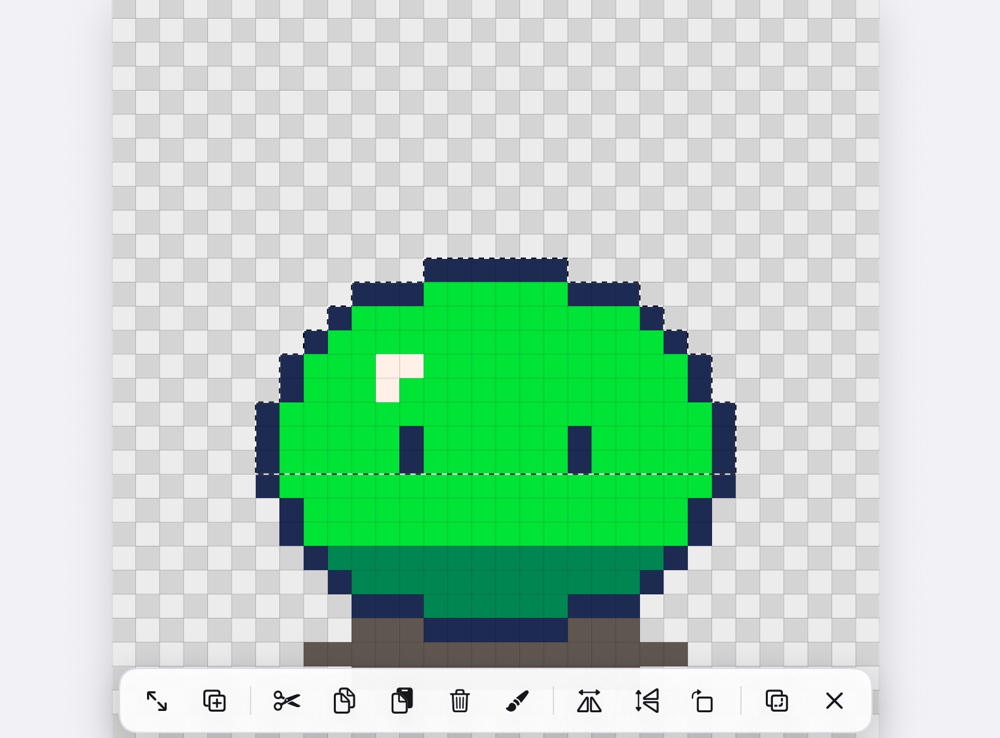
While something is selected, drawing, filling and erasing stay inside it, and a bar gives you the common actions: transform, duplicate and move, cut, copy, paste, delete, fill with the primary color, flip, rotate 90°, arrange, invert and deselect.
The bar takes the place of the timeline's header, so it never covers the drawing. Deselecting brings the header back. With the timeline hidden (collapsed or in focus mode), the bar floats at the bottom of the canvas instead.
While you drag a marquee or the lasso, a label next to it shows the size of the area, counting only the part inside the sprite. Once there's a selection, the bar starts with its size and the position of its top-left corner, like 12×8 · 3, 5.
Arrange (the layers button) brings what's selected to the front, one step forward, one step back or to the back. Each part of a drawing lives on its own layer, so there are two ways:
- This frame: only the current frame (or the frames picked in the timeline) changes. The cel gets a z-index, as in Aseprite's Cel Properties: it's drawn that many layers higher or lower without moving its layer. An arm can be behind the body in frame 1 and in front of everything in frame 4.
- Every frame: the layer moves up or down the stack.
It's also in the transform bar, where it stays part of the transform: Cancel puts the order back.
Selection opacity
With a selection tool (or Move) and something selected, the rail's slider sets the opacity of the selected pixels: drag it down to fade them, back up to restore them. It works from the pixels as they were, so you can try values freely, and each drag is one undo step. It changes every layer the selection caught.
Smart selection
- Tap a drawn piece with the marquee or lasso to select exactly its pixels: the ones touching each other (diagonals too) on the active layer, whatever their color. A tap elsewhere deselects, as in Aseprite. With All layers on (or several layers picked in the timeline) it picks the topmost of those layers under your finger and makes it active. In add mode, keep tapping to collect several pieces.
- Double tap with the marquee or lasso to select the whole grid cell under your finger (for example 16×16), ready to move, rotate or copy, like Aseprite's double click.
- The selection is the shape you drew, as in Aseprite, so you can paint in its empty part too. Turn on Fit to content to shrink a new or added shape to the drawn pixels inside it (over empty canvas it keeps its shape); subtracting and intersecting always use the whole shape.
- What moving, transforming, deleting and filling change is decided by the timeline, as in Aseprite: the cels picked there, or else the active layer in the active frame. Hidden and locked layers are left alone.
- All layers and All frames in the tool options are shortcuts for that range: All layers picks every layer in the active frame, All frames the active layer in every frame, both every cel. The timeline outlines those cels, and the range follows the active layer and frame while they're on. Picking cels by hand in the timeline turns them off. The Move tool has All frames too, for moving a layer in every frame without a selection.
- Copy (⌘C) takes the active layer, hidden or locked included; with a group active, its layers merged. Copy merged (⇧⌘C, in the Edit menu) takes every visible layer as they look. Cut clears what Copy took.
More selection commands
From the Edit menu (…): select all (⌘A), deselect (⌘D), reselect (⇧⌘D), invert (⇧⌘I), select layer content, and expand, contract or border by a number of pixels.
Moving and transforming
With a selection tool, drag inside the selection to move its pixels; drag outside to select again. The Move tool (V) moves the whole cel, or the selection if there is one.
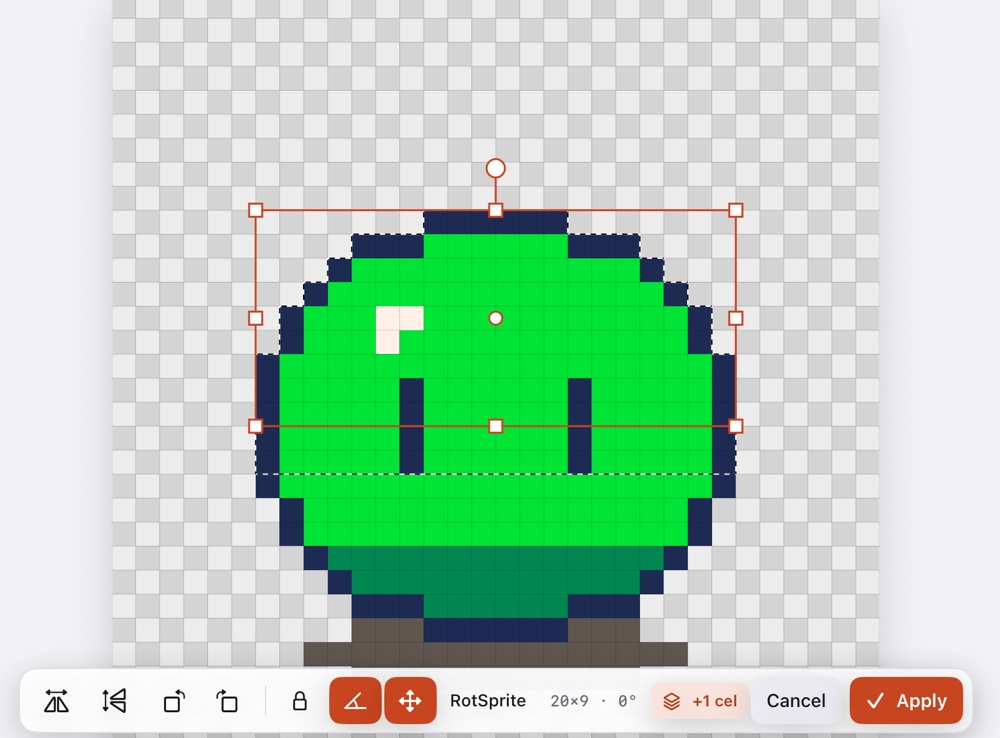
While pixels are floating, the canvas shows handles:
- drag the corners and edges to scale (drag past the opposite edge to flip);
- drag the round handle above to rotate around the pivot (the dot in the middle, which you can drag);
- the transform bar flips, rotates 90°, arranges, deletes the floating pixels (also ⌫), keeps the aspect, snaps the angle to 15° and chooses RotSprite (cleaner pixel art) or fast rotation.
Apply (or ↩) drops the pixels and keeps the selection where they went, as in Aseprite, so you can go to the next frame and move it again; changing frame or layer applies too. Tap outside to drop them and deselect in one go. When you moved a layer's content with the Move tool without selecting first, nothing stays selected. Cancel (⎋) puts everything back. The whole transform is one undo step. With a keyboard, the arrows nudge the pixels 1 px.
Stretch when moving
Select half a character and move it, and it normally tears away from the rest. Hold Ctrl while dragging, as in Aseprite, or turn on Stretch when moving in the transform bar (the four-arrow button), and the gap fills with the moved part's trailing edge, so the character grows instead of splitting. Turn it off and the part tears away again. It lasts one transform.
Transforming several cels
When several cels, layers or frames are selected in the timeline, moving, scaling, rotating or flipping changes all of them (a group stands for the layers inside it; hidden and locked layers stay put). A +N cels badge in the transform bar tells you how many more change.
Canvas commands
From the Edit menu: canvas size (the canvas shows its edges with handles: drag a side or a corner out to grow it there, in to shrink it; with In grid cells the sides land on grid lines, to add whole tiles. The bar shows the new size; Apply changes it in one undo step. Drawings, tilemaps, slices and symmetry axes keep their place), crop to selection, trim empty space, rotate and flip the whole canvas, and set the pixel ratio (for sprites drawn with wide or tall pixels).